
Setting up GoHighLevel CRM with NMI payment processing doesn’t have to be complicated. This step-by-step guide will walk you through the entire process, including essentials you’ll need before getting started. You’ll learn exactly how to connect NMI with GoHighLevel to start accepting payments.
What Is GoHighLevel and Why Use NMI?

GoHighLevel is an all-in-one CRM and marketing platform that helps you manage leads, send emails, and run automated workflows. It isn’t equipped with a payment processor, so you’ll need to connect to NMI to accept payments in person or online. NMI is a top choice among businesses for secure and efficient transaction processing.
Why NMI and GoHighLevel Integration Benefits Your Business
Integrating NMI with GoHighLevel connects your business to a powerful payment processing system. You can collect payments on websites, calendar appointments, funnels, and landing pages. NMI secures your transactions with its fraud-prevention solutions and lets you accept payments virtually everywhere.
What You Need Before Starting
Before you begin the integration, make sure you have:
- An active NMI gateway account and merchant account
- A GoHighLevel agency or sub-account
- Funnels version 2 upgrade (required for NMI integration)
- Your NMI API keys (Gateway ID, Security Key, and Public Key)
- A clear plan for how you’ll charge customers (one-time, recurring, or both)
You have to upgrade to Funnels version 2 to use this NMI integration. Do not skip this step.
Step-by-Step Guide: Connecting NMI to GoHighLevel
Follow these steps to link your NMI gateway to GoHighLevel.
Step 1: Gather Your Requirements
Be sure you have:
- Access to your GoHighLevel dashboard
- Your NMI API credentials (Gateway ID, Security Key, and Public Key)
Step 2: Find Your NMI API Keys in the Merchant Portal
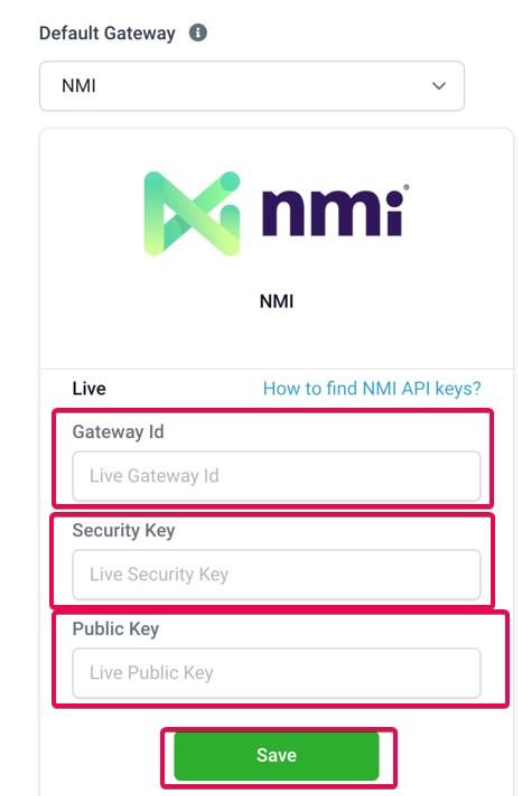
You need three pieces of information from your NMI dashboard:
Gateway ID

- Log in to your NMI account
- Go to Settings > Account Information
- Copy your Gateway ID
Security and Public Keys
- From your NMI dashboard, click Options > Settings > Security Keys
- Find the API Security Keys section
- Copy both your Security Key and Public Key
If you don’t have security keys yet, check NMI’s official guide to create them.
Step 3: Add NMI Gateway to GoHighLevel
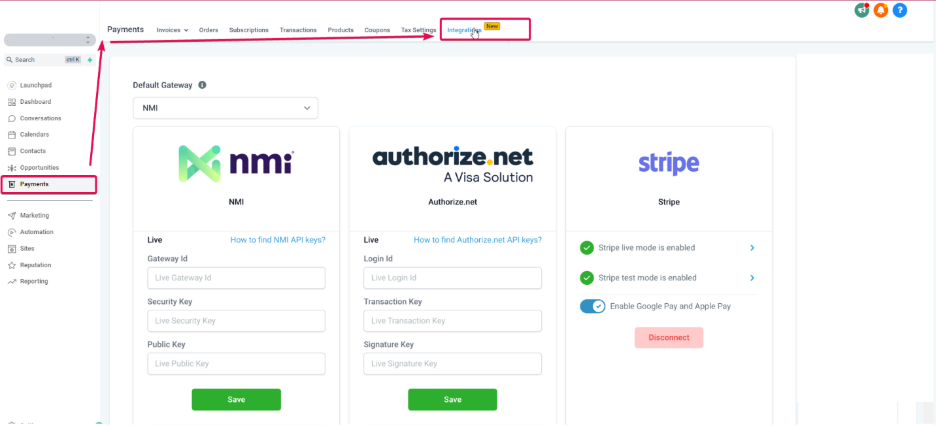
Now you’re ready to connect everything:
- In GoHighLevel, navigate to Settings > Integrations > Payment Gateway
- Click “Add Gateway”
- Select “NMI” from the list
- Enter your Gateway ID, Security Key, and Public Key
- Click “Save”
- Run a small test transaction to verify everything works correctly
Your NMI payment gateway is now connected to GoHighLevel.
Limitations and Payment Processing Details
There are some limitations you should keep in mind after setting up and testing your connection. First, only one subscription product can be purchased at a time at checkout. Subscription management takes place on GoHighLevel’s Subscriptions page, not your NMI merchant portal.
If you’re setting up a product or recurring payment, then you don’t need to sync products between NMI and GoHighLevel. Simply create your products under Payments > Products in GoHighLevel.
Lastly, GoHighLevel doesn’t have a built-in refund function for NMI transactions. You’ll need to process the refund through NMI’s dashboard.
Ready to Connect Your NMI Gateway with GoHighLevel?
AllayPay can help you configure your connection for your specific business needs. Want an online payment solution that is easy and secure? Contact AllayPay today for a free quote. You’ll get fast approvals, a smooth setup, and ongoing support. That’s the AllayPay difference.


